Vendor Management - General Tab
Items > Vendor Management > General
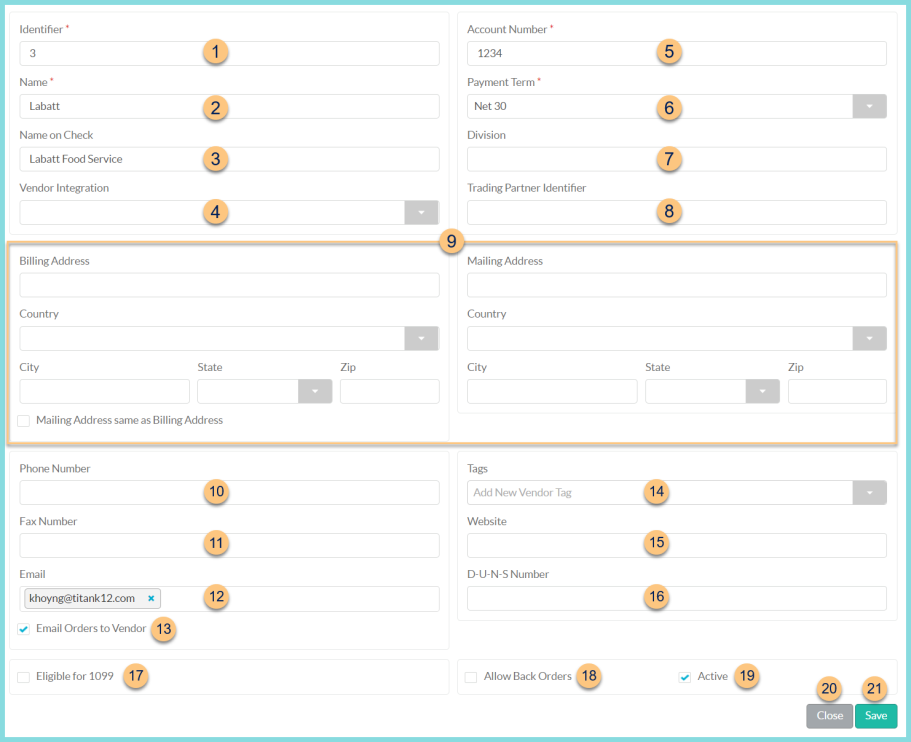
The fields on this page represent basic vendor information.
-
Identifier - change identifier if needed
-
Name - change vendor name if needed
-
Name on Check - enter the name to be printed on checks
-
Vendor Integration - select the vendor integration that will be used by this vendor if applicable
District Groups (enterprise only) - select district group(s) that utilize this vendor -
Account Number - enter the district's account number for the vendor
-
Payment Term - select the payment term for this vendor
-
Division - enter the Division number if needed for the vendor integration (varies by vendor)
-
Trading Partner Identifier - enter the Trading Partner Identifier if needed for the vendor integration (varies by vendor)
-
Billing Address and Mailing Address - enter the street Address, Country, City, State, and Zip of the Billing address. Select Mailing Address same as Billing Address if appropriate, otherwise, enter the street Address, Country, City, State, and Zip of the Mailing address.
-
Phone Number - enter the phone number
-
Fax Number - enter the fax number
-
Email - enter email address(es)
-
Email Orders to Vendor - check this box to email a PDF copy of all orders for this vendor to the email address(es) above
Note: This option is not available if a vendor integration has been selected above. -
Tags - enter applicable vendor tags
-
Website - enter the vendor's website
-
D-U-N-S Number - enter the vendor's D-U-N-S Number
-
Eligible for 1099 - check this box if a 1099 should be generated for this vendor, then enter the Tax Identification Number
-
Allow Back Orders
Checked - if a warehouse receives less than ordered of an item, TITAN will automatically create a new order for the difference
Unchecked - if a warehouse receives less than ordered of an item, TITAN will not create an order for the difference
Note: An order can be created manually for missing product if needed. -
Active - toggle active status
Note: Deactivating the vendor will remove any related Purchasing information from items. -
Close - click to return to Vendor Management without saving changes
-
Save - click to save changes